|
|
|
Ok, so we're ready to get started right? Once you've got all the parts collected don't forget the essential stuff like headgasket, head bolts, turbo water and oil lines (if they're old), ect... The order that you complete the conversion in is up to you but I chose to install the intercooler first since I needed to still drive the car for that week. But I'll save that til the end of the page since once you've got the cooler in you got to run it to something right? The car can also be driven after making the neccessary wiring changes so I'll start there.
Wiring:
The main electrical difference between early
T1's and early T2's is simply the wiring for the AIS (automatic idle speed
motor). The suck through T1's used a two wire AIS while the blow through
T2 and late T1 used a four wire AIS. Besides getting the four wire AIS
you also need to get the four wire connector for the AIS as well as add
the two extra wires (to the existing two) for the AIS at the computer.
The other difference between some early T1's (pre-87) and T2's was the plug at the TPS (throttle position sensor). While the TPS is electrically the same, if you wish to utilize the new style sensor all you need to do is change the plug end at the TPS. Up until '87 Chrysler had used a one wire oxygen sensor on T1's but in designing the T2 used a three wire oxygen sensor that while having the same electrical signal on one wire used a heater driven by the other two wires to shorten open loop time (cold start) and reduce emissions. So while the T2 computer won't know if you're using a one wire or three wire oxygen sensor, they were calibrated with the faster warm reading from the sensor in mind.
There are two easy choices for T2 computers. The
GLHS L-body computer (86 electronics) or the CSX Daytona  computer
(87 electronics). One point of consideration is that the 87 non L-body
cars used an underhood MAP sensor instead of the one installed on the computer
like the earlier cars. If you want to run the CSX computer in a non-underhood
MAP car then you can easily put it under the hood.
If you are converting a L-body then your easiest choice is to use the GLHS
computer as it only requires adding two wires to the red connector at the
computer. But you can also use the CSX Daytona computer with minimal hassel
if you add the extra two wires as well as move two other wires in the connectors
at the computer. If you are converting a Daytona then it's easiest to use
the CSX Daytona T2 computer, just adding the two wires for the AIS. But
if you can only find a GLHS computer then you need to add the two wires
plus move two more.
computer
(87 electronics). One point of consideration is that the 87 non L-body
cars used an underhood MAP sensor instead of the one installed on the computer
like the earlier cars. If you want to run the CSX computer in a non-underhood
MAP car then you can easily put it under the hood.
If you are converting a L-body then your easiest choice is to use the GLHS
computer as it only requires adding two wires to the red connector at the
computer. But you can also use the CSX Daytona computer with minimal hassel
if you add the extra two wires as well as move two other wires in the connectors
at the computer. If you are converting a Daytona then it's easiest to use
the CSX Daytona T2 computer, just adding the two wires for the AIS. But
if you can only find a GLHS computer then you need to add the two wires
plus move two more.
If you have an pre-'86 car that you're converting then you also need to pick up the later style "short and fat" distributor (thanks Cliff R!) and hall effect pickup. A note about hall effects: If you are buying a hall effect get it from the dealer, it's quite expensive but all aftermarket ones I've heard of fail prematurely.
So to do the wiring changes you need the four wire style AIS connector
and two three wire connectors for the TPS and O2 sensor. You can get these
parts at a salvage yard if you can find a T2 or late T1 car.
If you don't have access to these parts or are not good with wiring you can buy the harness
pre-made from Turbo Electrics.


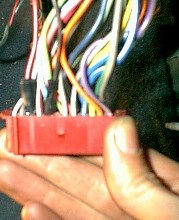
Now on to the AIS and TPS wiring. The TPS is the
same just different connector. Check the diagram above to see the wire
colors. You can cut and then solder the insert pins right on the ends of
the existing TPS wires. For the AIS you will use two of the exisitign wires
but have to run two new ones from the computer harness. The new ones go
in cavities 16 and 20 of the red connector at the computer.
Check the diagram above to see which ones. The pins that you need for the
computer are the same as the pins on the radio harness. Since I have an
aftermarket radio I just clipped two pins out and soldered on longer wires.
The pins just push into the harness. Then
I pushed the wires through the grommet on the fire wall where all the other
computer wires go through and ran the wires through tubing across the top
of the engine bay to the throttle body. Solder the other two wires on the
AIS connector to these but make sure which is which.
Here's a better picture! Well that's it for
wiring changes. Just plug the new computer in and if you need the short
and fat distributor the hall effect just plugs right in. Now let's get
to the rest of it.

Intake:
As we said on the previous page intercooling
the early T1 manifold is impossible since the inlet points straight  down
at the turbo. You can cut the inlet of the intake and reweld to better
suit intercooling as some list members
have successfully done but most people opt to using the later manifold.
So know you have your choice. Do you want to run the highly prized two
piece manifold that was designed for top end power? Or the lowly one piece?
In all actuality the power differences between the two manifolds is not
very significant. While the two piece may have been tuned for more top
end, the one piece doesn't seem to lack any go as many people have used
it with no drawback. In fact, since the two piece is somewhat hard to come
by and the fuel rail as well and since the one piece is cheaper and easier
to find it may be the best bet. If you use the two piece in a hood vented
L-body be prepared to "edit" the drip tray in the hood because it will
hit the intake manifold.
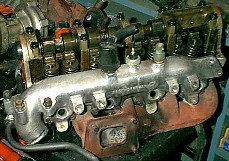
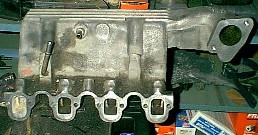
With all this in mind I chose to go with the one
piece intake (Thanks Matt G!).  Along
with the intake you'll also need the corresponding fuel rail. As you can
see this inlet points straight forward, right where you're intercooler
is likely to be. If you are using a one piece, it's likely not tapped for
the charge temp sensor since the late T1's did not use them. If you are
using the two piece intake it already has it. But you one piecer's don't
fret. You know what? The vacuum nipple on the manifold has the same thread
as the charge sensor so don't spend the money on the expensive tap just
remove the vaccum nipple. Along with the new
intake and fuel rail you'll also need the new throttle body. There are
two choices you can run the stock 46mm TB (Thanks
Matt G!) or use a V6 52mm TB. While the 52mm will flow more air, people
have found that it will decrease fuel economy and only really helps you
if you're running gobs of boost and have run out of other more important
improvements (ie.. exhaust). You will also have to port the inlet to the
manifold to 52mm. I initially did this but decided against it for now since
it won't help me at this point. You also need some T2
injectors which the T2 computer is calibrated for.
The throttle bracket for the blow through intakes is different than the early T1's so you can either buy a new cable or modify your existing T1 cable like I did. First the plastic lock on the cable is bigger than the hold on the bracket so you need to widen the bracket hole a bit. Check it out. The slot that the end of the cable slides into on the throttle body is different too. First remove the U-shaped piece on the end of your cable. Then remove the metal tube shield on the cable. Know you have couple of choices for attaching the end. The end of your T1 cable should be like a round ball similar to a fishing weight. You could slot a piece of tubing to go over the end that will slide into the throttle body or use a roll pin to go over it. I couldn't find anything to fit so I used a small cotter pin and slid it over the cable so that the round end of the pin fit at the ball on the cable. The I trimmed the pin to the length of the slot on the throttle body. Then I popped the cable retainer over the throttle body arm and all was secure. I know this sounds confusing but it will all be clear when you have the parts in front of you. Check it out.
Now for the charge sensor and knock sensor just screw em in the manifold and the connection of the engine harness will plug right on. My wires were long enough to reach the sensors but some people have told me that they had to lengthen the two wires on the charge sensor and the one wire on the knock sensor by an inch for it to reach. That's about it for the intake.
Exhaust:
The T2 turbo and exhaust manifold are different
than the T1. But don't run out and buy them quite yet. The only difference
between the T2 and T1 turbo is the inlet compressor housing, the wastegate
can, and the manifold flange, the important thing, the core, is the same
and will flow the same. You can easily adapt the compressor housing to
be T2 ready and the manifold flange only needs to be ground with a notch
in it. The wastegate can only needs to have to holes drilled in the braket.
A bench grinder works the best for the grinding and only takes about 30
minutes with a $39 Black and Decker bench grinder.
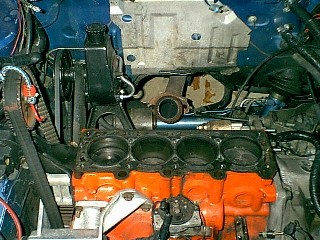
The easiest thing to do mount your new blow through intake and then try and mount the exhaust manifold and you'll get an idea of what metal needs to be removed. Do the exhaust manifold first and then mount it on the head and try and mount the turbo and you'll see what you have to do to the turbo. Now for the compressor housing. On your T1 setup the outlet of the turbo faces straight at the inlet of the intake. That doesn't help you now that you have a different intake and really doesn't make it easy to run tubing to your intercooler. So what you need to do is remove the three bolts that hold the wastegate actuator can on. Then losen the remaining four bolts on the back of the housing just a turn or two and very gently try and rotate the compresor housing counter clockwise. How far you rotate it is up to you. Gary D. did his to 48 degrees. I initially rotated mine to 90 degrees so that it point straight at the front mounted intercooler. But I underestimated how far the turbo hangs down and the compressor housing actually hit the transmission. I then loosened the four bolts again and rotated it so it ended up as far down as possbile with enough clearence under the outlet to put intercooler hose over it. It ended up being right around 60 degrees. Now tighten down one bolt when you have it where you want it and lift the head off the block again. Look at the back of the housing and see where the bolt holes line up to mount the wastegate can so it lines up with the wastegate arm on the exhaust housing. At 60 degrees mine was just off of where the stock holes on the bracket were. So I drilled two new ones ( up to six holes now, two stock, two screw up for 90 degrees and two for 60 degrees). Then move the flat plates that hold the compressor housing on one at a time so that they are out of the way of the two holes that you will use for the wastegate can bracket, be careful not to rotate the housing or you will have to take the head off again when you realize it. Consequently, I wanted to change the angle a little after I put the head on and WAS able to loosen the housing and turn it just enough to where I wanted it. It took some patientience and several sizes of 13mm wrenches. Mount the wategate can and check if it hits the intake runner 4. Mine did and I had to bend the backet way from the intake just a bit for it to clear. I also ground a little of the metal on the can bracket to give some more clearence. Once everything fits tighten down all the bolts evenly. Mine cleared by only about 1/8". Now you need to make a new inlet for the turbo. The T2 inlet points staright away from the turbo while your T1 inlet turns 90 degrees up. You can do this various ways but what I did was simply to take the stock inlet, cut out the 90 degree section and JB Weld the two end pieces back together and it worked perfectly. It may not be the best way but I can't weld aluminum. This eliminates the mount the EGR but hey T2's didn't have EGR anyway. You now have to somehow plug the hole that the EGR tube comes out of on the exhuast housing. I couldn't unscrew mine cause it was so rusty so I welded the hole shut from the inside of the exhaust. If you can get the fitting unscrewed you can screw in a steel plug. Your other option is to get the 2.5" exhaust housing (from 2.25" you have now) which will yield better flow but then you will also need to get a 2.5" downpipe. That's it for the exhaust and turbo. The T1 oil and water lines work fine with this setup.
Check out the pics!
Check out the man
with the plan when it comes to this - Gary Donovan's page!
Intercooler:
Now we need to install the intercooler. The
cars that came intercooled came with a special narrowed radiator with the
intercooler mounted beside it. If you can get your hands on one of these
it will make the install process that much easier and you can use the stock
hoses. You can get them off 86-87 GLHS's or T2 Daytona's. Or if you're
like me and don't have access to these things then you have to get more
creative. For me it was better anyway cause I already had a new radiator
and buying just an intercooler was cheaper than the rad/ic setup. Plus
I wanted my intercooler front mounted where it wuld get the most air.
If you are using the L-body T2 radiator/intercooler setup in L-body or a G-body T2 rad/ic setup in a G-body then they may drop right in. I'm not sure. I know if you use the more plentiful G-body rad/ic in a L-body then you just need to fabricate the passenger side mount. Once everything is in you will need a new upper radiator hose, as well as the stock intercooler hoses.
Ok, now for the rest of you who just have the intercooler and want to mount it up front in the fascia. Check out the front mount intercooler page.
Misc.
Well that's about it for the conversion. The only other things are the vaccum lines and pcv. The vaccum lines are no big deal is your existing ones are in good shape. I hooked my existing manifold vacuum lines to the metal tube coming off the new manifold. I hooked the existing TB lines to the new TB w/ check valves since the old ones never saw boost, and I hooked the brake booster line to the vacuum nipple on the back of the manifold inlet neck. I removed the wastegate line to the solenoid, since I'm not using the computer boost control, as well as the egr lines. The pcv tube on the valve cover had to rotated down 30 degrees to clear the throttle cable bracket. If you are using the stock airbox then the pcv should hook right up. Right now mine is just a downdraft tube but I will be hooking it into a air/oil separating filter when I put the pcv vent on the fuel pump block off plate so any blowby oil will drain into the oil pan and not into the environment.
Conclusion
I would say to anyone looking for the cheapest
route for this conversion to just find a T2 car and take everything you
can. But some of us don't have the luxury of doing that and collect pieces
over time and may end up making some custom things but in the end when
it all works it doesn't matter how you got it done. I had fun doing the
conversion and it wasn't hard at all, just took some patience. I hope this
page will someone out there and is my way of giving back to everyone who
helped me. If you have any questions, ask away. If you have comments/suggestions/corrections
just send em my way. And may the boost be with you. ~ Dylan
The finished product: Engine 1
Engine 2 Engine
3
| Damages: | |
| Front mount intercooler install - detailed on other page | $193 |
| Custom intercooler hoses - detailed on other page | $65 |
| Intake & TB - used | $50 |
| Wiring | $50 |
| Distributor - used | $25 |
| Hall Effect | $78 |
| Head Bolts | $30 |
| Head Gasket | $30 |
| Oxygen Sensor | $42 |
| 804 injectors | $109 |
| Stage II GLHS computer | $129 |
| Misc. nuts bolts ect... | $20 |
| Total | $821 |